You turn on a security switch in Windows called Memory Integrity. Windows asks you to restart. You do. The switch is back off, and a small grey line blames "an incompatible driver" - usually without saying which one.
This post explains what that switch actually does, in plain English, before it goes deep. Then it shows you exactly how to find the driver responsible, and how to tell this feature apart from a second, completely different security switch that sits right next to it and gets blamed for the same problem.
Watch on YouTube · Subscribe at @EndpointWeekly
Memory Integrity (also called HVCI) is a Windows 11 security feature that stops malware from turning a memory-corruption bug into running code inside the kernel. It refuses to start if any loaded driver breaks one simple rule, and Windows often can't say which driver. The real answer lives in three places: a WMI class called Win32_DeviceGuard, a registry value, and one specific Event Viewer log that names the actual file. There is a second, unrelated switch next to it called the vulnerable driver blocklist - different mechanism, different failure mode, and this post keeps them clearly apart throughout.
The problem: the toggle reverts and names nothing useful
Here is the shape of the failure, in the order a helpdesk usually sees it.
- A user or a policy turns on Memory Integrity.
- Windows asks for a restart - the feature can only start at boot.
- After the restart, the toggle is off again.
- Windows Security shows a message about an incompatible driver - often with an empty list underneath it.
Three separate reasons make that message so unhelpful. Worth knowing all three before you start hunting for the driver.
First, the check built into the Windows Security screen only looks at driver files it can inspect without running them. A driver that only misbehaves once a specific code path actually executes will pass that check and still break the feature later.
Second, some drivers load so early in the boot process that nothing has a chance to log the failure. Microsoft says this plainly: for a boot-critical driver, Memory Integrity can be turned off silently, with no dialog and no event to rely on.
Third, there's a deliberate safety net built in, and it looks exactly like a failure. If your PC crashes during boot shortly after Memory Integrity was turned on, Windows automatically turns it back off again - on purpose, to stop you being locked out of your own computer. That's not a bug reverting your setting; that's the safety net doing its job.
Three names, one feature. Memory Integrity, HVCI (hypervisor-protected code integrity), and hypervisor-enforced code integrity are three different names for the exact same thing. It first shipped under an older name, Device Guard - which is why every registry path in this post still says DeviceGuard, even though Microsoft no longer uses that name anywhere except those paths.
And here's the mix-up that sends people down the wrong road entirely: right next to the Memory Integrity switch in Windows Security sits a second switch called the Microsoft Vulnerable Driver Blocklist. They live on the same settings page, under the same "Core isolation" heading - and they are not the same thing. One checks a driver's code for a specific bad pattern; the other checks a driver's name against a deny-list of drivers Microsoft already knows are dangerous. A fix for one does nothing for the other. This post keeps them separate the whole way through.
Why it happens: what Memory Integrity actually is
Start with the everyday version, no jargon. Windows normally has one gatekeeper deciding which drivers are allowed to run - a piece of the kernel itself. The obvious problem: if an attacker manages to compromise the kernel, they've also compromised the thing that was supposed to be checking for that.
Memory Integrity fixes that by moving the gatekeeper somewhere the kernel itself can't reach. Here's the chain, in order:
- At boot, Windows loads a small file (
hvloader.dll) that starts up a hypervisor - a thin layer that sits below Windows itself. - That hypervisor creates a locked, isolated space that Windows treats as trustworthy even if the main kernel gets compromised.
- A second, minimal kernel - the "secure kernel" - runs inside that isolated space.
- Memory Integrity moves the driver gatekeeper into that secure kernel, out of reach of anything running in the normal Windows kernel.
- From that point on, one simple rule is enforced everywhere: a piece of memory can be writable, or it can be executable (able to run as code) - never both at the same time.
That last rule is the entire feature, and it has a name IT people use constantly: W+X (write plus execute). Without this rule, a common attack works like this: malware finds a bug that lets it write data into memory, then tricks Windows into treating that data as a program and running it. If a memory page can never be both writable and runnable at once, that entire attack style stops working - even against bugs nobody has found yet.
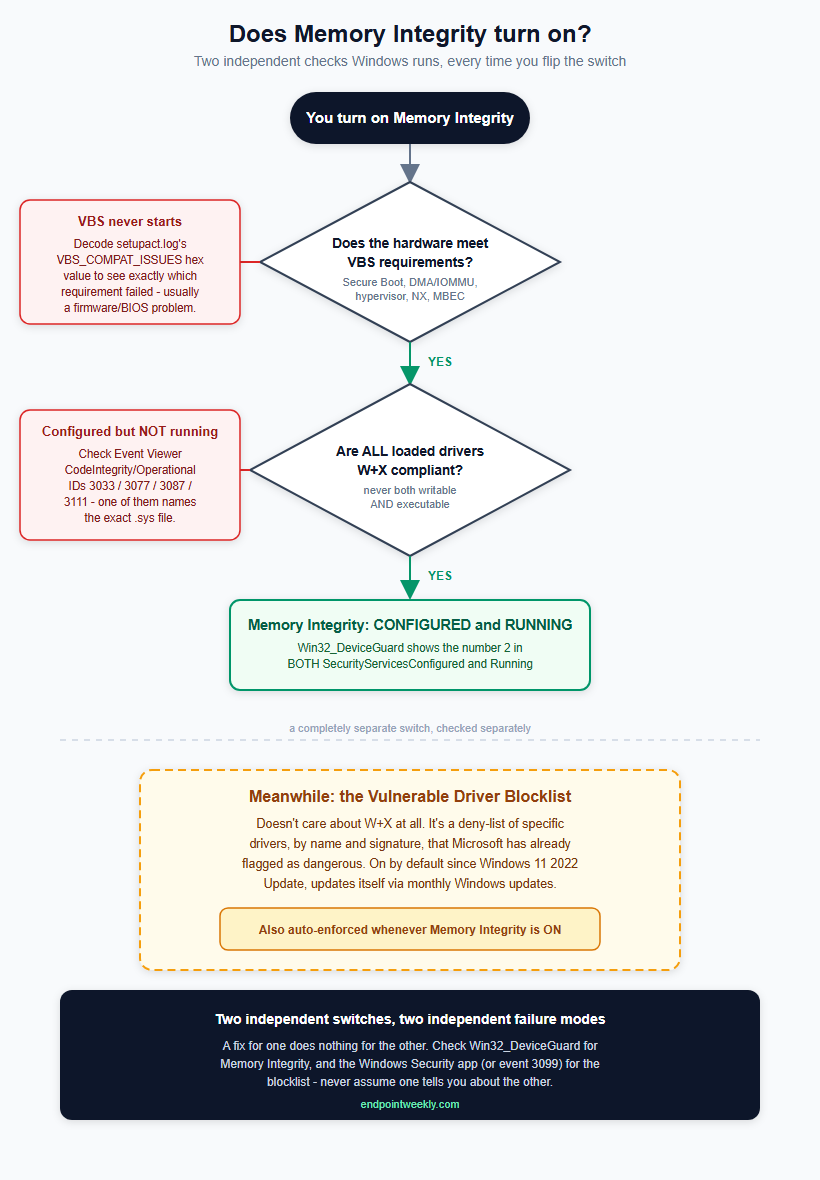
The two independent checks Windows runs, and where each one can say no.
Two things have to be true simultaneously for that gatekeeper to switch on: the hardware underneath has to support it, and every single loaded driver has to obey the W+X rule. Fail either one, and the feature refuses to start - which is exactly what the diagram above shows.
Gotcha: a "safe" check can't catch every violation. Microsoft says this directly: no static scan - the kind that just reads a driver's file without running it - can catch every possible W+X violation. Some violations only show up when a specific line of code actually executes. That's exactly why the "incompatible driver" list in Windows Security can be completely empty while the feature still refuses to start.
Every driver has been required to follow the W+X rule since 2016 - that's a decade of warning - and plenty still don't. The full list of the ways a driver can fail, the full hardware requirements list, and a common myth about TPM being one of them, are all in the quick reference table further down, so this section can stay focused on the concept.
One footnote worth knowing now, not just in the tables: Memory Integrity turns itself on automatically on a clean install of Windows 11 on modern-enough hardware. It does not auto-turn-on when an existing PC is simply upgraded to a newer Windows version - that's Microsoft's documented behaviour, not a bug. So a fleet of laptops that were upgraded in place, rather than reimaged, will mostly have this feature off by default. If you want it everywhere, you have to turn it on deliberately through policy - covered in "The fix" below.
The other switch: the vulnerable driver blocklist
Now the part everyone mixes up. The blocklist doesn't care about the W+X rule at all. It's simply a list of specific drivers, by name and digital signature, that Microsoft has already identified as dangerous - either genuinely malicious, or so badly written that malware can abuse them to gain extra privileges.
It's been switched on by default for everyone since the Windows 11 2022 Update, and it updates itself quietly through your normal monthly Windows updates - you don't have to go and fetch anything. There's also an optional, more complete downloadable version, covered in "The fix" below.
Both switches carry the same real risk: they can make a PC unbootable. This is Microsoft's own warning, not ours. Turning on Memory Integrity, or blocking a driver that Windows was quietly depending on, can in rare cases blue-screen a machine or stop it booting. Test on a small pilot group first. Never flip either switch across your whole fleet in one go.
How to verify: three places that tell you the truth
Work through these three checks in order. Each one answers a different question, and reading them out of order is the most common way people reach the wrong conclusion.
1. Ask Windows directly: is it actually running?
Windows keeps the real answer in a WMI class built exactly for this. Run this from an elevated PowerShell window (elevated means "Run as administrator" - Microsoft documents this specific check as requiring it):
The one line that matters most, if you only remember one thing. SecurityServicesConfigured is "what you asked for." SecurityServicesRunning is "what actually started." The number 2 present in the first list but missing from the second is the entire diagnosis in one glance - and it tells you a driver is blocking things, not that nobody turned the feature on. The full numbered meaning of every value here is in the quick reference below.
Prefer clicking instead of typing? Run msinfo32.exe as administrator and scroll to the bottom of "System Summary" - look for a line called "Virtualization-based security Services Running" and check it lists "Hypervisor enforced Code Integrity".
2. Check the registry: what did policy ask for, versus what's actually true right now
There are two genuinely different kinds of registry data here, and confusing them is the single most common mistake in this whole topic. One kind records what someone asked for. The other records what's actually happening right now. You need both.
What was asked for lives here:
The value Enabled set to 1 here means "someone turned Memory Integrity on." What's actually true right now lives somewhere else entirely:
The value HVCIEnabled here is the one Microsoft documents as reflecting live, right-now state - not intent. If the first key says 1 but this one doesn't, something stopped it from actually starting this boot, and that something is almost always a driver.
Gotcha: hand-editing the wrong copy wastes hours. If a device is managed by Group Policy or Intune, those tools write to a completely separate key - HKLM\SOFTWARE\Policies\Microsoft\Windows\DeviceGuard. Edit the CurrentControlSet copy by hand on a managed device, and the very next policy refresh will silently overwrite you. Always check the Policies key first on any device you don't fully control yourself.
The full list of every registry value worth knowing - including the two that arm the crash-safety-net mentioned earlier, and the blocklist's own on/off value - is in the quick reference table below.
3. Event Viewer: the one place that actually names the file
This is the step that answers the question everyone actually has: which driver. Microsoft's own troubleshooting guidance points here directly. Open Event Viewer and go to:
Rather than clicking through by hand, pull the relevant entries with one command. This grabs every documented event that can name a blocked file, over the last month:
Not every hit here is an HVCI hit - and that's a genuinely common false alarm. This same event log also logs ordinary code-signing problems that have nothing to do with Memory Integrity - like an app trying to load an unsigned DLL. Two IDs, 3111 and 3087, are the ones specifically about the hypervisor-protected check this post is about. See the real example in "Proof it worked" below, where this exact false alarm shows up.
Gotcha: this log is small and forgets fast. By default this log is capped at roughly one megabyte and set to overwrite its oldest entries. On a busy machine that can be a matter of hours of history, not weeks. If you flip the switch on Monday and go looking on Friday, the evidence may already be gone. Re-trigger the change and check again immediately, rather than waiting.
One more surface worth knowing about, mainly for upgraded (not freshly-imaged) fleets: Windows records its own auto-enablement decision, made at install time, in a setup log at C:\Windows\Panther\setupact.log. Search that file for the word HVCI. The three possible outcomes Windows can write there, and the full decoder table for the specific hardware-failure codes it can report, are both in the quick reference below - this section covers WMI, the registry and Event Viewer, which is what you'll use 95% of the time.
There's no service and no scheduled task for this - and that's normal
Worth saying plainly, because people go looking for one. There is no Windows service that runs Memory Integrity, and no scheduled task that starts it. The hypervisor and secure kernel are loaded directly by the boot process, before Windows even has a concept of "services" yet. You can't restart them, and there's nothing to set to "Automatic." If you want the authoritative answer to "is it running," go back to Win32_DeviceGuard - nothing else is more trustworthy.
The fix: find the driver, then enable through policy
Step 1 - build your list of suspects
If an event already named a driver, skip ahead. If not, list what's actually loaded so you have something to compare against vendor updates:
Step 2 - fix it, one of three ways
- Update it. Compatibility with this feature has been required since 2016, so a current build from the vendor usually already complies. Check Device Manager or the vendor's own site.
- Remove it. If the hardware or software is retired and nobody owns it any more, uninstall the driver. In practice, this is the most common real-world fix.
- Escalate it, with real evidence. If the vendor's newest build still fails, "Memory Integrity won't turn on" gets ignored. "Your driver fails with an Execute-Write Section violation" - the exact failure name from the quick reference table - gets a real engineering answer.
If a PC is already stuck unbootable, there's a documented recovery path - but it needs a driver problem fixed first, or you'll be right back here. Disable whatever policy turned the feature on, boot into the Windows Recovery Environment, and set HKLM\SYSTEM\CurrentControlSet\Control\DeviceGuard\Scenarios\HypervisorEnforcedCodeIntegrity value Enabled to 0, then restart. If it was turned on "with UEFI lock" (see the fix steps below), you'll also need to disable Secure Boot in the firmware menu first - which means physically being at that machine.
Step 3 - turn it on properly, through policy, not by hand
Once the drivers are clean, enable the feature through Group Policy or Intune, never by editing the registry on individual machines by hand.
Group Policy:
- Open the Group Policy Editor (
gpedit.msc), or open the relevant GPO in the Group Policy Management Console. - Go to Computer Configuration > Administrative Templates > System > Device Guard.
- Open Turn On Virtualization Based Security and select Enabled.
- Under Virtualization Based Protection of Code Integrity, choose Enabled without UEFI lock for your first rollout. Only pick "with UEFI lock" once you're confident, since it can't be undone remotely.
- Under Select Platform Security Level, choose Secure Boot for most fleets - "Secure Boot and DMA Protection" means any machine lacking an IOMMU chip gets no protection at all, not a lesser version of it.
- Select OK, then on a domain-joined PC run
gpupdate /forceor restart, then restart the device again - the feature only starts at boot.
Intune (cloud-managed devices):
- Sign in to intune.microsoft.com, go to Devices > Configuration > Create > New Policy.
- Platform: Windows 10 and later. Profile type: Settings catalog.
- Add settings, search for Virtualization Based Technology, and tick Hypervisor Enforced Code Integrity.
- Set it to Enabled without lock to start. Assign to a small pilot group first - never to every device on day one.
Good news: Group Policy and Intune are not two separate settings to keep in sync. They write to the exact same registry key underneath. Configure it from whichever one place you actually manage this fleet from, and don't touch the other - conflicting settings from both at once is a real, documented way to lose an afternoon to a mystery.
Step 4 - handle the blocklist separately, because it needs its own proof
Check the in-box blocklist the supported way:
To deploy the fuller, downloadable version: download it from aka.ms/VulnerableDriverBlockList, rename it to SiPolicy.p7b, copy it to %windir%\system32\CodeIntegrity, then run the refresh tool from aka.ms/refreshpolicy. Then actually confirm it landed - filter Event Viewer's CodeIntegrity/Operational log to event 3099 and match its policy name against your policy file.
Turning the policy on doesn't stop a driver that's already running. Microsoft states this plainly: if a vulnerable driver is already loaded when you activate the blocklist, it keeps running until the next restart. A script that applies the policy and reports "done" hasn't actually protected anything yet - build the restart into your change, or the dashboard will lie to you.
Finally, there's a third, related Defender setting worth turning on alongside the blocklist: the Attack Surface Reduction rule Block abuse of exploited vulnerable signed drivers (GUID 56a863a9-875e-4185-98a7-b882c64b5ce5), found under Intune > Endpoint security > Attack surface reduction. Understand the boundary: this ASR rule stops a vulnerable driver being saved to disk in the first place. It does nothing to a driver that's already there - only the blocklist (or Memory Integrity itself) can refuse to load one that already exists.
Proof it worked: a real run, on a real laptop
The companion script for this post, Get-HvciReadinessReport.ps1, automates every check in this post: it reads the WMI class, the registry values, the on-disk files, the Event Viewer log, and the setup log, then translates every number into the plain-English sentence you just read above. It is entirely read-only - it never turns anything on, off, or changes any setting. Think of it as running the whole "How to verify" section for you, in one go, and printing a plain verdict at the end.
This is a genuine run, on a real Windows 11 Enterprise laptop. The device name has been replaced; nothing else has been edited.
Now the part that actually matters most - the driver-hunting section, because this is where the script proves it isn't just repeating clean numbers back at you:
Read that last block twice, because it contains the two lessons of this entire post in one screenshot. There were real code-integrity events on this machine - but they named a browser's graphics component, not a kernel driver, so they're irrelevant here. And the script says so explicitly, in plain language, rather than making you count numbers and guess.
Why the script refuses to guess. If it isn't run as administrator, or if the core WMI check itself fails, the script stops immediately with an error rather than printing a report full of blanks. A blank report looks exactly like "everything is off" - which is dangerously different from "we weren't allowed to check." Every check in the script says so explicitly when something couldn't be read, instead of quietly moving on.
The script needs no extra software - everything it uses ships inside Windows already - and it runs the same way on both Windows PowerShell 5.1 and PowerShell 7.
Quick reference: every table, in one place
Everything below is reference material pulled out of the sections above, gathered here so the main walkthrough stays readable. Bookmark this section and come back to it - you won't need most of it on a first read.
Win32_DeviceGuard: every documented number
| Property | Value | Documented meaning |
|---|---|---|
| VirtualizationBasedSecurityStatus | 0 | VBS is not enabled. |
| 1 | VBS is enabled but not running. | |
| 2 | VBS is enabled and running. | |
| SecurityServicesConfigured / SecurityServicesRunning | 0 | No services. |
| 1 | Credential Guard. | |
| 2 | Memory integrity. | |
| 3 | System Guard Secure Launch. | |
| 4 | SMM Firmware Measurement. | |
| 5 / 6 | Kernel-mode Hardware-enforced Stack Protection, enforced or audit. | |
| 7 | Hypervisor-Enforced Paging Translation. | |
| AvailableSecurityProperties / RequiredSecurityProperties | 0 | No relevant properties, or nothing required. |
| 1 | Hypervisor support. | |
| 2 | Secure Boot. | |
| 3 | DMA protection. | |
| 4 | Secure Memory Overwrite. | |
| 5 | NX protections. | |
| 6 | SMM mitigations. | |
| 7 | MBEC or GMET. | |
| 8 | APIC virtualization (Available-only). |
Registry values worth knowing
| Value | Data | What it does |
|---|---|---|
EnableVirtualizationBasedSecurity | 1 | Turns VBS on. Nothing else matters without this. |
RequirePlatformSecurityFeatures | 1 or 3 | 1 = Secure Boot only. 3 = Secure Boot + DMA protection (blocks any PC without an IOMMU entirely). |
Locked | 0 or 1 | 1 = UEFI-locked. Can only be reversed from the firmware menu, in person. |
Scenarios\...\Enabled | 1 | Turns Memory Integrity on. The one that matters most. |
Scenarios\...\WasEnabledBy | 2 | Arms the crash-safety-net. Deleting it greys out the UI with "managed by your administrator". |
CI\State\HVCIEnabled | 0 or 1 | Live state right now - not intent. This is the one that tells the truth. |
CI\Config\VulnerableDriverBlocklistEnable | 0 or 1 | The blocklist's own on/off flag. Observed, not officially documented by name - treat as a hint, not a contract. |
Event Viewer: the full CodeIntegrity/Operational catalog
| Event ID | What it means | Names a file? |
|---|---|---|
| 3001 | An unsigned driver was attempted to load. | No |
| 3004 | Signature/page-hash could not be verified. | Yes |
| 3010 | The signature's catalog file is invalid. | No (noise) |
| 3023 | Driver failed the policy check. | Yes |
| 3033 | File failed the policy check - often a revoked or expired signature. | Yes (driver or app DLL - see the false alarm above) |
| 3034 | Audit-mode version of 3033. | Yes |
| 3074 | Page-hash failure while HVCI was enabled. | Yes |
| 3076 / 3077 | Audit / enforced block by an App Control policy. | Yes |
| 3082 | Would have blocked this non-WHQL driver, if enforced. | Yes |
| 3084 / 3085 | WHQL signing is / isn't enforced this boot. | No |
| 3087 | Memory Integrity compatibility event - specifically about HVCI. | Yes |
| 3089 | Signature details for a blocked file (pairs with the IDs above). | No, context only |
| 3099 | A policy was loaded - this is how you confirm the blocklist landed. | No |
| 3111 | File failed the HVCI policy specifically - the clearest HVCI block there is. | Yes |
setupact.log: the setup-time decision, and the failure-code decoder
Search C:\Windows\Panther\setupact.log for the word HVCI. Three possible outcomes:
| Line you'll find | What it means |
|---|---|
SYSPRP HVCI: Enabling HVCI | Healthy - auto-enabled at setup. |
...OS does not meet HVCI auto-enablement requirements | Not enabled at setup - normal on an upgraded (not freshly imaged) PC. |
...Compatibility did not pass. VBS_COMPAT_ISSUES 0xXXXXXXXX | A specific hardware/firmware requirement failed - decode the hex below. |
If you get that third line, decode the hex value against this table - each failure is one bit, so a code can mean more than one thing at once:
| Hex bit | What failed |
|---|---|
0x00000001 | Unsupported CPU architecture (e.g. old 32-bit x86). |
0x00000002 | SLAT (a CPU virtualization feature) required. |
0x00000004 | Secure Boot capability required. |
0x00000008 | IOMMU (DMA protection chip) required. |
0x00000010 | MBEC or GMET (a CPU feature) required. |
0x00000020 | UEFI firmware required. |
0x00000040 | UEFI's memory-attribute table required. |
0x00000080 | A specific ACPI firmware table (WSMT) required. |
0x00000100 | UEFI memory-overwrite lock required. |
0x00000400 | Hardware virtualization must be on in the BIOS. |
0x00000800 | Secure Launch required (ARM64 only). |
0x00002000 | System drive below the 64GB minimum size. |
0x00004000 | System drive must be an SSD. |
0x00008000 | Intel CET required (Windows 11 21H2 only). |
0x00010000 | This ARM chip isn't compatible with VBS at all. |
0x00020000 | Below the 8GB RAM minimum. |
Microsoft's own worked example: 0x000000C0 breaks down into 0x80 + 0x40 - the ACPI table plus the UEFI memory-attribute table. Both of those are firmware problems, fixed with a BIOS update from the PC's manufacturer, not anything changeable in Windows itself.
Full hardware requirements, and the TPM myth
| Requirement | What it means |
|---|---|
| 64-bit CPU with virtualization | Intel VT-x or AMD-V. |
| SLAT | Intel EPT or AMD RVI - a specific virtualization feature. |
| IOMMU / SMMU | Intel VT-D, AMD-Vi, or Arm64 SMMU. Every device that can access memory directly must sit behind one. |
| Firmware SMM protection (WSMT) | A specific firmware table the PC maker must implement. |
| UEFI Memory Attributes Table | Firmware must cleanly mark which memory ranges are code vs. data. |
| Secure Memory Overwrite (MOR) v2 | A UEFI-protected setting. |
| Every loaded driver | Must obey the W+X rule. This is the one that actually bites in the real world. |
| Secure Boot | Must be enabled. |
The TPM myth, stated precisely. Microsoft does list a TPM 2.0 chip as a general VBS platform component elsewhere in its documentation - that part is true, and often gets repeated. But nowhere in the actual, documented list of reasons Memory Integrity refuses to start does TPM appear. It's not one of the RequiredSecurityProperties values above. It's not one of the VBS_COMPAT_ISSUES hex bits above. If you're troubleshooting a stuck toggle, a missing or disabled TPM is not where the problem is - don't waste time chasing it, and don't build a compliance check that assumes it matters here.
Separately, Memory Integrity turns itself on automatically only under these conditions - and only on a clean install, never on an in-place upgrade:
| Component | Minimum for automatic turn-on |
|---|---|
| Processor | Intel 8th gen+ (or 11th gen+ Core for 21H2), AMD Zen 2+, or Qualcomm Snapdragon 8180+. |
| RAM | 8GB minimum, 64-bit Windows only. |
| Storage | SSD, 64GB minimum. |
| Drivers | Every loaded driver must already be compatible. |
| BIOS | Virtualization switched on. |
The driver failure categories, by name
| Category name (use this in a vendor ticket) | What the driver actually did wrong |
|---|---|
| Execute Pool Type | Asked for a block of memory that's allowed to run as code, when it shouldn't have. |
| Execute Page Protection | Marked a memory page as runnable when it should have been marked data-only. |
| Execute Page Mapping | Same problem, in a different Windows memory-mapping API. |
| Execute-Write Section | The driver file itself has a section that's both writable and runnable - the classic W+X violation. |
| Section Alignment Failures | A section of the driver file isn't aligned to a memory page boundary correctly. |
| IAT in Executable Section | A lookup table inside the driver sits in the wrong kind of memory section for Windows to update it safely. |
The binaries actually doing the work
File (in C:\Windows\System32\) | What it does |
|---|---|
hvloader.dll | Loaded at boot; picks and starts the right hypervisor. |
hvix64.exe / hvax64.exe | The actual hypervisor - Intel and AMD versions respectively. |
securekernel.exe | The secure kernel that runs inside the isolated space. |
skci.dll | The part that actually enforces the W+X rule inside the secure kernel. |
ci.dll | The equivalent code-integrity checker on the normal (non-secure) side. |
vbsapi.dll | The API the setup-time compatibility check calls into. |
driversipolicy.p7b (in CodeIntegrity\) | The built-in vulnerable driver blocklist file. |
SiPolicy.p7b (in CodeIntegrity\) | Where the fuller downloadable blocklist goes, if you deploy it. |
The Intune / CSP value table
| Value | Meaning | Note |
|---|---|---|
| 0 | Disabled. | The documented default. |
| 1 | Enabled with UEFI lock. | Can't be reversed remotely. |
| 2 | Enabled without UEFI lock. | Start here for a pilot. |
References
- Microsoft Learn — Enable memory integrity
- Microsoft Learn — Memory integrity enablement
- Microsoft Learn — Virtualization-based Security (VBS)
- Microsoft Learn — Driver Compatibility with Hypervisor-Protected Code Integrity (HVCI)
- Microsoft Learn — Microsoft recommended driver block rules
- Microsoft Learn — Understanding App Control event IDs
- Microsoft Learn — VirtualizationBasedTechnology Policy CSP
- Microsoft Learn — Attack surface reduction rules reference
- Microsoft Learn — driverquery
- Microsoft Learn — Memory Integrity and Virtualization-Based Security (VBS)
- Microsoft Support — KB5020779: the vulnerable driver blocklist
Download it from Imran76Awan/Windows-11-Scripts — no sign-in required. It is read-only: it reports and never changes a device or anything in Intune. Validate it in your own environment before relying on the output.